廉价共享存储解决方案2-drbd+cman+gfs2
1、修改hosts文件
[root@localhost ~]# vi /etc/hosts
127.0.0.1 localhost localhost.localdomain localhost4 localhost4.localdomain4
::1 localhost localhost.localdomain localhost6 localhost6.localdomain6
172.16.20.45 gfs_1
172.16.20.46 gfs_2
10.10.10.45 gfs_1
10.10.10.46 gfs_2
2、配置双机互信
[root@gfs_1 ~]# ssh-keygen -t rsa -P ''
Generating public/private rsa key pair.
Enter file in which to save the key (/root/.ssh/id_rsa):
Your identification has been saved in /root/.ssh/id_rsa.
Your public key has been saved in /root/.ssh/id_rsa.pub.
The key fingerprint is:
a9:8a:3a:3d:64:eb:0b:de:94:a5:92:e4:ba:5d:f3:de root@gfs_1
The key's randomart image is:
+--[ RSA 2048]----+
| |
| |
| |
| . |
| . . S |
|o + + . |
|.B =o . |
|+oBo + . |
|+*=+..o E |
+-----------------+
[root@gfs_1 ~]# ssh-copy-id -i .ssh/id_rsa.pub root@gfs_2
The authenticity of host 'gfs_2 (172.16.20.46)' can't be established.
RSA key fingerprint is d6:c8:35:ee:99:67:83:fb:b1:21:57:1e:e2:a1:4c:e9.
Are you sure you want to continue connecting (yes/no)? yes
Warning: Permanently added 'gfs_2,172.16.20.46' (RSA) to the list of known hosts.
root@gfs_2's password:
Now try logging into the machine, with "ssh 'root@gfs_2'", and check in:
.ssh/authorized_keys
to make sure we haven't added extra keys that you weren't expecting.
[root@gfs_2 ~]# ssh-keygen -t rsa -P ''
Generating public/private rsa key pair.
Enter file in which to save the key (/root/.ssh/id_rsa):
Your identification has been saved in /root/.ssh/id_rsa.
Your public key has been saved in /root/.ssh/id_rsa.pub.
The key fingerprint is:
97:ee:cc:12:29:c9:ad:db:62:7c:4b:b2:f8:05:bd:9b root@gfs_2
The key's randomart image is:
+--[ RSA 2048]----+
| |
| |
| |
| . . |
| ..oS.o |
| +.++ |
| ..o+.. |
| .=*o* |
| .o++Eo+ |
+-----------------+
[root@gfs_2 ~]# ssh-copy-id -i .ssh/id_rsa.pub root@gfs_1
root@gfs_1's password:
Now try logging into the machine, with "ssh 'root@gfs_1'", and check in:
.ssh/authorized_keys
to make sure we haven't added extra keys that you weren't expecting.
2.1验证一下
[root@gfs_2 ~]# ssh gfs_1 date 没有输入密码直接出来结果,互信配置完毕
2015年 12月 14日 星期一 23:48:18 CST
2.2配置yum 阿里源
1.卸载自带的源
rpm -aq | grep yum | xargs rpm -e --nodeps
安装阿里源
rpm -ivh http://mirrors.aliyun.com/centos/6/os/x86_64/Packages/python-iniparse-0.3.1-2.1.el6.noarch.rpm
rpm -ivh http://mirrors.aliyun.com/centos/6/os/x86_64/Packages/yum-metadata-parser-1.1.2-16.el6.x86_64.rpm
rpm -ivh http://mirrors.aliyun.com/centos/6/os/x86_64/Packages/yum-3.2.29-69.el6.centos.noarch.rpmhttp://mirrors.aliyun.com/centos/6/os/x86_64/Packages/yum-plugin-fastestmirror-1.1.30-30.el6.noarch.rpm
注意最后两个安装包一定要一块安装,否则会因为相互依赖而安装失败
添加源
cd /etc/yum.repos.d/
mkdir bak
mv rhel-source.repo bak
wget -O /etc/yum.repos.d/rhel-source.repo http://mirrors.aliyun.com/repo/Centos-6.repo
把$releasever 全部改为6
yum clean all&yum makecache
3、安装DRBD 请参考
http://user.qzone.qq.com/58740020/blog/1448855653
3.1、不一样的地方
同步以上操作或文件,并初始化资源及启动服务
drbdadm create-md r0
service drbd start
此处只能提升一个节点为主资源
drbdadm primary --force r0
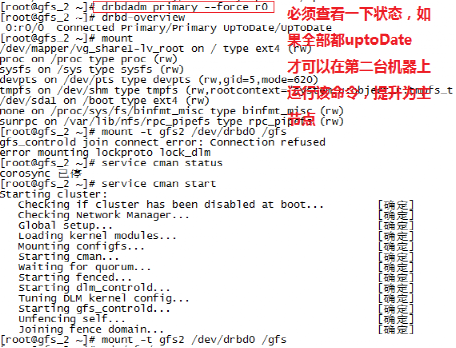
查看信息等待同步完成
drbd-overview
0:web Connected Primary/Secondary UpToDate/UpToDate C r----
3.2挂载使用
mke2fs -j -L DRBD /dev/drbd0 # 仅在一个节点执行
mkdir /mnt/drbd
mount /dev/drbd0 /mnt/drbd
如果之前提升二个节点都为主资源时,在这个 /mnt/drbd
目录下同时读写可能会有IO异常,导致drbd设备失效
为了解决这个问题则使用 gfs + cman 实现分布式文件锁方案
3.3安装cman
yum –y cman
3.4 gfs集群文件系统
在 /usr/local/drbd-utils-8.9.4/etc/drbd.conf
在配置文件的 net 选项中
allow-two-primaries yes;
安装 cman 底层消息通讯 + 全局锁功能
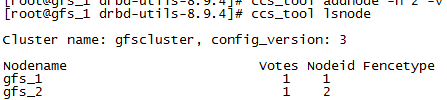
ccs_tool create gfscluster
ccs_tool addnode -n 1 -v 1 gfs_1
ccs_tool addnode -n 2 -v 1 gfs_2
查看节点
ccs_tool lsnode
3.5再次启动 drbd 服务
service drbd stop
如果之前做过 ii) 步实验的话,请确定弹出的信息
drbdadm create-md r0
service drbd start
提升第一节点为主资源
drbdadm primary --force r0
此处可以提升二个节点为主资源(分别执行)
请注意请确保一个主已经同步完成

再提升一下个为主节点
drbdadm primary --force r0
3.6、安装GFS2
yum install -y gfs2-utils
格式化gfs2并多处挂载
将drbd格式化为gfs2 (这一步只需要一个节点操作即可)
mkfs.gfs2 -j 2 -p lock_dlm -t gfscluster:gfslocktable /dev/drbd0
第二个节点同步
partprobe /dev/drbd0
多处挂载使用
mkdir /gfs
mount -t gfs2 /dev/drbd0 /gfs
节点1
节点2

4、测试

居然无法访问

Cman 服务器居然无法重启。
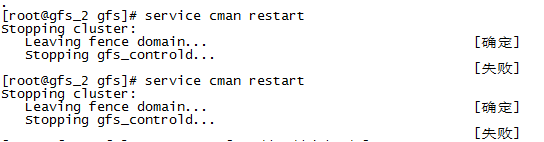
强行关机重启之后先查看状态,然后提升为主节点,第二台机器同样操作,
然后分别启动cman ,接着分别挂载。 gfs_controld 没有办法重启,只能强制重启服务器了
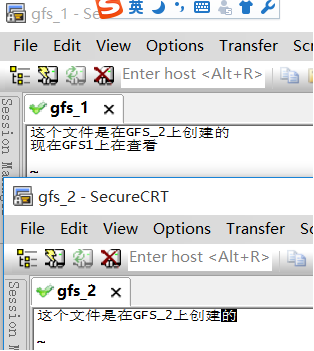
两个节点同时编辑vi gfs_1.txt
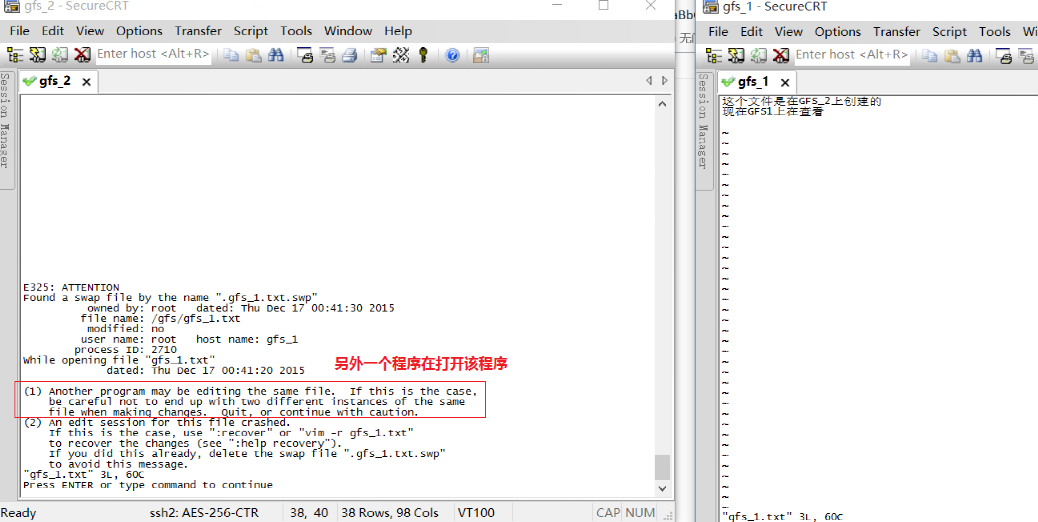
同时操作,以最后修改后保存的文件为准。
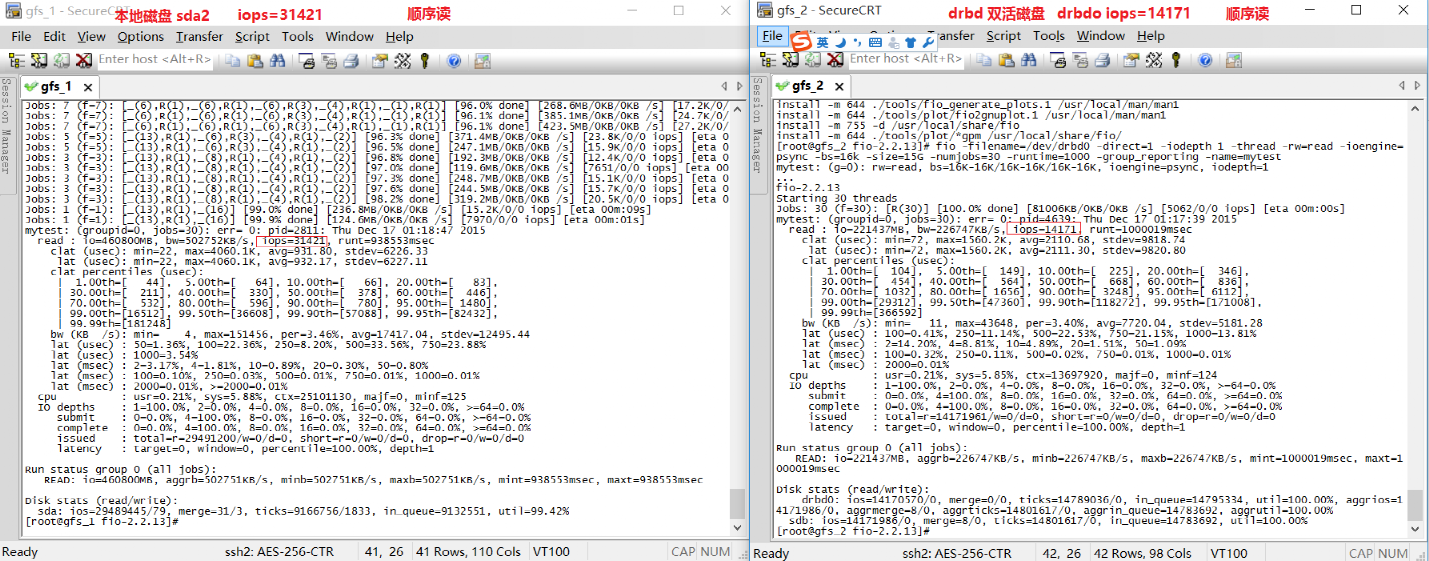
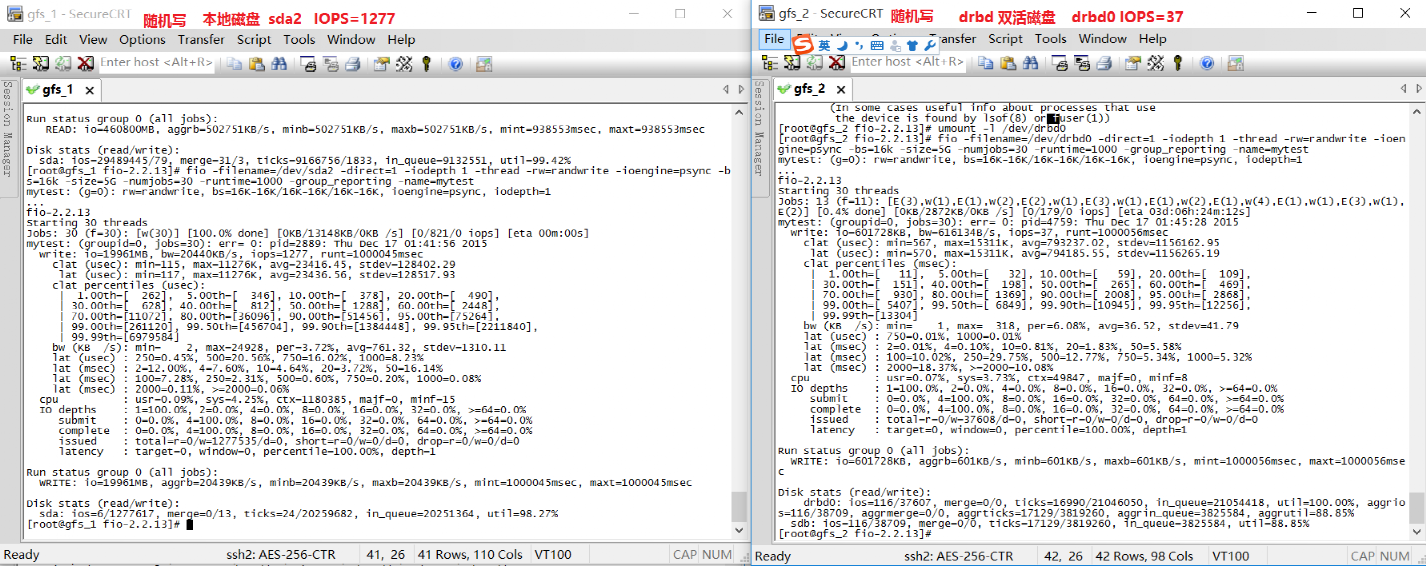
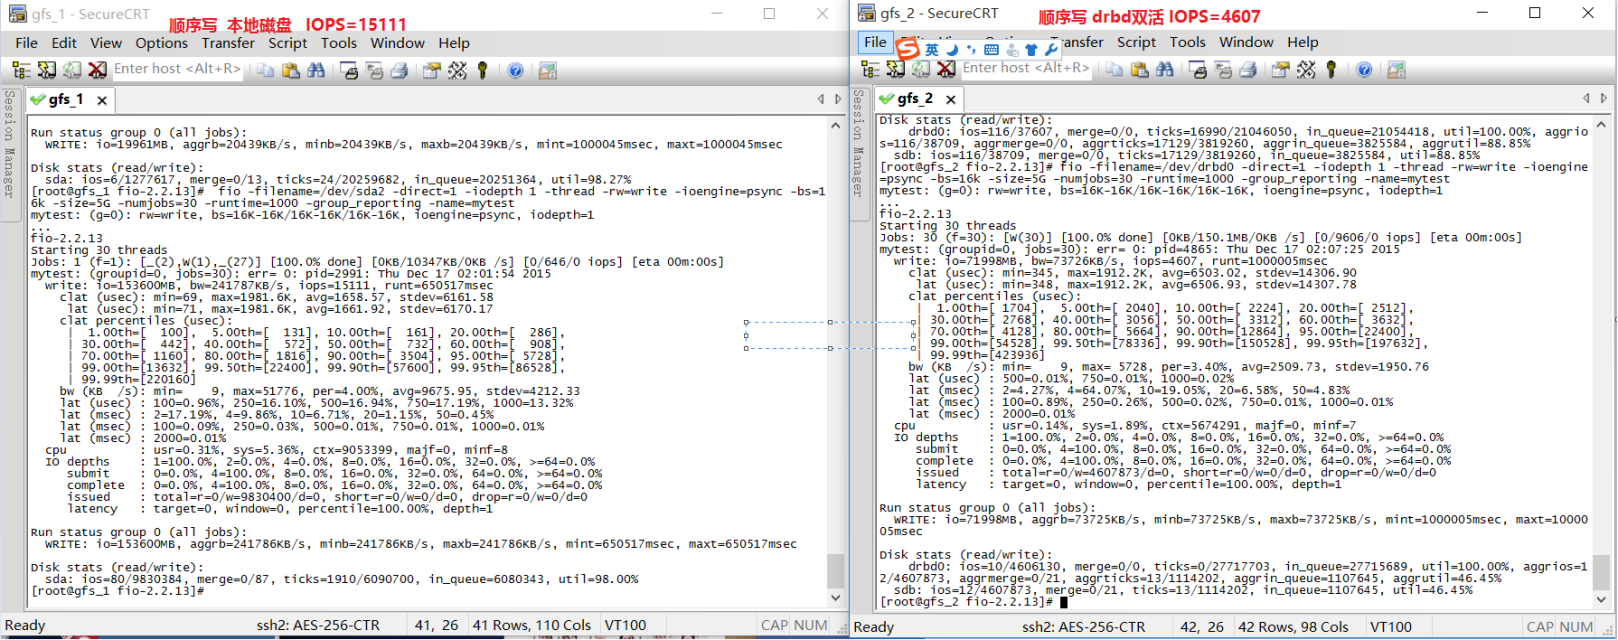
i/o 测试
安装FIO 测试 I/0 读取速度
FIO 安装步骤http://blog.chinaunix.net/uid-8116903-id-3914246.html
从顺序读的IOPS 来看结果 本地磁盘比DRBD双活的IOPS大了2.2倍。
5、总结
感觉双活模式还不大成熟,如果出现故障,有部分情况需要人工干预才能完全恢复正常。而且速度方面不是很理想。
 评论加载中,请稍后...